What's Cooking?

I dream of the day when we finally embark on our kitchen renovation.  I'm talking complete gut job.  Yes, it will be inconvenient and dusty, but hopefully, worth the endeavor.  You'll see why I'm anxious to tackle that reno once I share the "before" photos of our lovely 1955 original kitchen.  Until then, come see some kitchens that have me swooning.

shaker kitchen cabinets subway tile
original source unknown

You can't go wrong with a white kitchen featuring subway tile and a shaker door profile!  Classic, timeless, and simply beautiful.  Those brass cone pendant light fixtures are unexpected and stunning!  They add a bit of sophisticated elegance to an otherwise casual farmhouse kitchen.

brass kitchen cabinet pulls copper faucet marble countertop mid century modern
Sarah Sherman Samuel I Smitten Studio

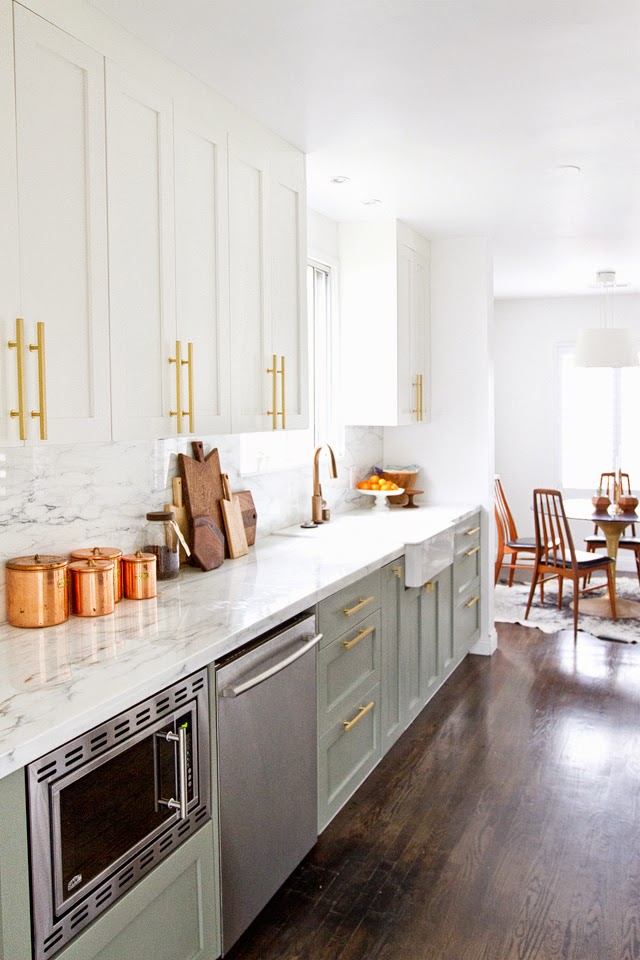
I love the high-low blend of this kitchen.  Did you know that the shell frames of the cabinets are from Ikea?!  You'd never know the difference since they are covered with custom solid wood cabinet doors.  The marble slab counter/backsplash, brass hardware, and copper-toned faucet take this kitchen up many notches!


subway tile navy blue island marble quartz countertop

Sasha Adler & Lauren Gold

I love two-toned kitchens, and this one in navy blue and white is fabulous!  I love the blue-gray subway tile backsplash paired with the white-veined countertops.  The bistro stools are definitely on my shortlist for island seating options in our new kitchen! :)

See more kitchen inspiration on my Pinterest boards, that can be found here and here.

Lesson in Bookcase Styling

Whatever happened to the days of actually using a bookcase just for its intended purpose, i.e. storing books?!  Unlike the public library, you will likely see more "styled" bookcases/shelves in the home setting that are filled with as many decorative accessories than books.  With a trend towards "right-sized" living, homeowners are finding ways to maximize every inch of space for both storage and display.

Shelving is the perfect opportunity to incorporate something decorative with practicality.  I tend to lean towards a combination of decorative and functional elements when it comes to styling shelves.

Here is a real-life example of how shelving is used in a home setting for both function and decor:

dining room storage library multi-functional multi-purpose expedit shelving

This homeowner maximized their tight living quarters by installing two side-by-side Ikea bookcase cabinets for both storage and display.  The cabinets are an effective solution for storing and displaying dishes, accessories, and books.  In smaller spaces especially, a double-duty "library and china cabinet" is very practical.

However, I think the overall appearance of the shelves can be improved so it appears more streamlined and uncluttered.  Here are a few design tips that can be incorporated:


bookcase styling


  • Edit, edit, edit.  Use restraint with the number of items you display to achieve a less cluttered appearance.  I always advise people to rotate their collections rather than putting it all on display at once.  You can achieve greater impact when the eye is able to focus on fewer things.


  • I'm not sure why, but items that are grouped in odd numbers lends itself to a more balanced arrangement.  A grouping of 3-5 objects that vary in scale and height is effective.  If you happen to have several smaller, same-colored objects, try grouping them together to create the look of a solid display item.  But don't be afraid to have one larger-scaled item stand alone too!


  • Play with how books are displayed.  They don't all have to be lined up perfectly straight, or stacked flat.  Lean a few books, and mix in a decorative accessory.  Use a book as a surface to add height when displaying a smaller-scaled decorative object.  A useful tip if you have a lot of books is to store some into a woven basket, and "display" the basket instead of all the books.


  • Always step back from the cabinet and make sure it is balanced in both object scale and visual weight.  Make sure it is not "top heavy", "bottom heavy" or "side heavy".


(Tip: To add stability to stand-alone bookcases/cabinets, you may want to secure the units to the wall using brackets.)


The styling of the shelving above exemplifies restraint and balance, while serving as both display and storage.  The appearance is streamlined, balanced, and uncluttered.


LET'S CONNECT

Kenarry: Ideas for the Home

Go headboard...less!!!

No headboard?  No problem.  Here are a few of my favorite alternatives to the traditional headboard that pack some major style punch!

Statement Textile

alternative headboard hang tapestry or rug
image via Domino

Hang a beautiful tapestry, large blanket/throw, or even a flat-woven rug to add color, pattern, dimension, and texture!

Accent Wall

wallpaper stenciled wall alternative headboard solution
image via Apartment Therapy


Create an accent wall for your bed using wallpaper, paint, or a stenciled design!

Oversized Pillows

large throw euro size pillows alternative headboard solution
image via Simple & Chic

Prop some larger pillows (euro size works great) against the wall, and layer with varying pillows of different scales and sizes!

Gallery Wall

no headboard alternative art wall
image via Domino

Create a focal wall as your headboard by adding a photo/art gallery!  Just make sure the frames are securely fastened to the wall.  Allow a little "head room" so you can sit upright comfortably on the bed.

Paint It On

no headboard alternative use paint
source unknown

Draw and paint your own headboard!  You can also use decals.

Overscaled Art

no headboard alternative framed photograph or art
source unknown

Large, overscaled, "quiet" artwork helps create a serene and calm background in the bedroom.  But you can also inject some pattern and fun with a colorful piece of art.  No need for a headboard with an overscaled piece of art!

LET'S CONNECT

Kenarry: Ideas for the Home

Contrasting Project Styles

If you follow me on Instagram, you may have seen tidbits of some design projects I'm currently working on.  I thought I'd share a little about the projects with all of you because they span the realm aesthetically.  It is interesting to simultaneously work on projects that have completely different design styles!


COASTAL TRANSITIONAL

turquose teal aqua modern casual traditional area rugs
CAD INTERIORS design project great room family living dining room

The project above is in the middle stages of the design planning phase.  I'm working on a great room that is HUGE on space, and includes a seating area and casual dining nook.  Before I got started, this client sent me inspirational photos (including the ones above) that reflected the "mood" she wanted for the space.  "Coastal Transitional" is the direction I'm going with...  I provided three layout options (with mood boards), and we have been "piecing" the final space plan together.


RELAXED NEW TRADITIONAL

CAD INTERIORS design traditional eclectic collected global living family room

This project's design aesthetic could not be any more different than my Coastal Transitional project.  Contrasting styles, different color directions, etc...  The only similarities between the two are the spaces being worked on (i.e. main living areas) and the fact that both are younger families!


In this home, I really admired all the beautiful passed-down treasures (rugs, antique furnishings) and wonderful collection of art.  Although we will be incorporating many of these more traditional pieces, I want to balance it with a fresh and modern approach since they are a young family.  My goal is to give them a space that is "Relaxed New Traditional", with an eclectic and collected vibe.  Unlike the Coastal Transitional project, the space is much cozier in size, and quite challenging to design since it needs to pack multiple functions.  Space planning is key to this project!

Also, in case you missed it, click here to see the project I just finished for Chairish.  That was a mid-century modern design - completely different from the above projects!  No matter the design aesthetic, I can appreciate the beauty in all!

Follow me on Instagram for more frequent peeks into what I may be working on. :)

Mid-Century Modern Office for Chairish

A few weeks ago, I received an e-mail from the Community Manager at Chairish asking if I would be interested in doing a design board for them inspired by the highly acclaimed Mad Men series.  I am very selective with the companies that I partner with, but Chairish is one that I happen to love!  So I gladly accepted.  For those of you who are unfamiliar, Chairish is an online site where "design lovers can buy and sell" high-quality vintage items.  Take a look when you get a chance!  Their mid-century modern category is pure eye candy.

Mad Men is a popular AMC television series that is known for its fashionable characters and stylish mid-century modern set design.  In fact, the show has helped fuel the resurgence of the design aesthetic.  After several years, the series is coming to an end, and Chairish is honoring the final season with Mad Men inspired designs!

For this mood board, I created a present day office for Don Draper, the stylish, masculine, and charismatic advertising executive and main character of the show. 


don draper office mad men chairish
Click on image for larger view.


Here's a look at one of his earlier office spaces on the show...


mid century modern

...and his more recent office space

mid century modern chairish

Over time, Don's office went from pretty much all brown to brown with a little pop of color... and I continued to introduce color to the present day office design!  I injected a vibrant mix of colors and patterns through the upholstery, textiles, and accessories/artwork.  I think it helps give the room a fresher, contemporary look.  The furnishings are still rooted in mid-century modern design - simple, clean lines and warm wood finishes.  That's what's great about mid-century modern furnishings... they are easy to style!  I would say that Don Draper's present day office is filled with character and dimension - just like Don himself!


mid century modern design mad men furniture
Click on the links to get the look:
retro clock I adrian pearsall sofa I tiered side table I brass rotating coat rack I secretary bar cabinet I similar coffee table I serapi red rug I yellow chair I green ottoman I brass floor lamp I milo baughman style chair I john widdicomb brass console I blue bench I desk I desk lamp I executive desk chair I blue overdyed rug

My favorite is definitely that Adrian Pearsall walnut sofa!  Make sure you check out the entire selection of fabulous mid-century modern furnishings and decor over at Chairish.


Sharing with:
This post was produced in partnership with Chairish.  All opinions expressed and design/mood boards are 100% my own.

Budget-Friendly Bedroom Design with Sources

Bedrooms often take a back seat when people consider sprucing up their homes.  Common living spaces, such as family rooms, living rooms, and kitchens, are typically thought of first since those are spaces that everyone (i.e. guests) sees.  Yet, bedrooms are where we sleep and recharge every single day.

Since I am guilty myself of putting our bedroom on the backburner, I thought I'd put together a budget-friendly bedroom design that could motivate all of us to spruce up our resting spaces.


If you opt not to layer the rugs, you could save even more by using just one area rug!  If you have a sitting area, you can also use one rug under the bed and use the other to ground the seating area.

This budget-friendly design lays the foundation for anyone to create a rather neutral transitional style bedroom from scratch... for less than $1500.00!


Get the look:
*Items currently on sale

Dresser*                                        $285.94
8x10 jute area rug*                       $227.70
5x8 flatwoven rug*                        $214.75
Wall sconces (each)                       $89.95

20x20 throw pillow cover $36.57 each / $44.60 with polyfill insert
20x20 ikat navy pillow cover $18.00

Please contact me if you are interested in the decorative pillows.

LET'S CONNECT

INSTAGRAM I PINTEREST I FACEBOOK I GOOGLE+

Sharing with:
Kenarry: Ideas for the Home

Renovation woes in the family room...

Well, hello there!  I can't believe it's been a week since my last post.  I've been battling flu-like symptoms (dare I say the flu) in what feels like forever...well, over a week.  I'm finally starting to feel better, and am slowly catching up and getting back into the swing of things.  Thank you to those of you who reached out wondering where I've been.  :)

Anyway, I wanted to share an update on our family room renovation - yes, the one that started way back in January!  There is a reason I have been silent about the reno.  Honestly, I'd rather just show you a bunch of pretty "after" pictures at this point.  But unfortunately, we are still far from the finish line.


renovation quote and sayings

We hit a stumbling block in the renovation, and it had to do with the new walls.  As expected with all renovations, there may be issues that arise that kinda stump you.  In this case, the new drywall took some figuring out... and it put us in a holding pattern as a result.  Sigh.

After we primed and painted, we noticed "seams" where some of the sheetrock pieces were joined.  Our contractor has had to come back on a few occasions to redo those particular areas.  The third (and hopefully last) attempt required him to cut open the seams, re-tape, re-mud, re-sand, etc.  Yesterday, he also took down the tarp barrier that was in place during demo and construction.  He believed that the heat retained in the room may have contributed to the seam issue (since air wasn't properly circulating while the tarp was up).


DIY renovation drywall installation
It's been so long since we've had a continuous sight line into our family room!

He comes back on Wednesday to check on the walls.  We are crossing our fingers that the issue is finally resolved, so we can forge ahead and put this room back together.

On a positive note, my handy hubby did tackle a few things in the room that wouldn't be compromised by the messy drywall work.


CAD INTERIORS family room renovation DIY molding

Trim was installed around the sliding doors.  All the nail holes have been spackled and filled.  The moldings just need to be painted, which will be done when we re-paint the walls. #butwejustpaintedthewalls

DIY base 2x4 wood built in cabinets


DIY built in cabinetry ikea hack

My hubby also built and installed the foundation for the new built-in cabinetry.  I'll share about the built-ins once they are done.

CAD INTERIORS DIY family room renovation
Progress shot of the newly painted conduit

The white electrical cord is long gone - well, camouflaged!  The electrical conduit was painted to blend in with the wood ceiling beams.  We "color matched" the beams with paint called "natural cork".  I think it covered up the conduit just fine; and, for roughly $2 (in sample size paint), it was an economical and effective solution.


slow progress saying and quote

There is still plenty to do, including fixing up the fireplace, re-doing the dutch door & door jamb, finishing up the built-ins, installing all the trim, and putting in new flooring and baseboards.  But slow progress is better than no progress!  At this rate, I'm just hoping to have the room back by the holidays.  I'm kidding...I hope?!


LET'S CONNECT


What I've learned, one year later... a blogiversary!

Caution: You may want to grab a cup of coffee because today's post is very, very long.

One year ago today, I hit the "publish" button on my very first post without any real thought about where this blogging journey would lead.  I was just excited to share design inspiration, ideas, and tips related to anything and everything interior design.  Since we are in renovation mode, the blog also became a natural outlet for me to document our home renovation journey - all the trials and triumphs.


With a year under my design blogging belt, I can tell you that I have the utmost respect for bloggers who have successfully been on this journey for years - like nearly a decade!  Writing post after post of originalinspiring content filled with authentic and valuable information takes commitment, effort, creativity, diligence, and many, many, many hours/days/weeks of research and time.  I quickly learned that successful bloggers put in time and work - a lot of it!  They don't just regurgitate information.  I've stumbled upon many blogs that just didn't strike accord, while others keep me coming back to their sites.  My hope for this blog is definitely the latter.  To accomplish that, it is important that I continually strive to publish "quality" content in my own authentic voice.


When I started this blog, my goals were straightforward: 1) introduce my "design voice" to anyone willing to listen, 2) share what inspires me design-wise while providing tips along the way, 3) document our home renovation so we can look back and appreciate the journey of making this house our home, and 4) reach out to those who may need assistance with designing and decorating their homes.  Yes, this blog complements my design services.  It was always meant to.  But I continue to dedicate time to blog because I enjoy sharing and inspiring.


This blog is my virtual little corner to freely share my designs, projects, ideas, and tips to hopefully inspire all of you.  I don't blog with the intent to make an income.  Trust me.  There is no financial compensation for the hours and time spent producing content.  You must truly be passionate about what you're blogging about and not do this with the intent of making money... although any income stream would be welcome, let's not kid ourselves!


How hard can it be to blog?  Well, it's easy to get started from a literal standpoint, but it's not easy to keep going and stay motivated.  Being a newer design blogger is not easy...whatsoever...don't fool yourself or be fooled.  One of the biggest challenges, if not the largest, is gaining and growing a readership, especially when you are late to the party.


Are you still there?! :)

Who knew how saturated the design blogging world was?!  Definitely not me.  It is so easy to feel discouraged and perhaps stop blogging, especially when you are a late entrant among a gazillion established bloggers.  One of the most valuable lessons I have learned this past year is to NOT compare where your blog stands (exposure and popularity) against more established blogs.  After all, everyone had a beginning...


As a newer blogger, it is very important to reach out, network, and make yourself known to gain exposure and attention.  It is also important to engage with other bloggers.  What's the point in blogging if no one reads your posts?!  This was not easy for me since I can be reserved and very private.  Ironic because blogging is so transparent!  Some channels that have worked for me include joining relevant online communities and accessing the power of social media.  I have been fortunate to attract clients and receive a few opportunities behind the scenes as a result of blogging and social media.  In fact, I just agreed to a fun collaboration that I signed on for this month! #willsharesoon


When I started blogging, I literally jumped right in without doing any research about how the whole blogging thing worked.  BIG OOPS!  I can be spontaneous like that.  I hadn't even read a single design blog until this past year.  BIGGER OOPS!  I can be an idiot crazy like that.  A big lesson I learned, however, was that I should have corralled some of that enthusiasm and did my research.  If I had known how evolved the design blogging world was, I honestly would have been more methodical about how I launched this blog.  But you know what?!  Without that naive enthusiasm, I probably would have never hit the "publish" button that very first time...  Fortunately, it is working out okay so far.  But I am still getting up to speed, learning how to navigate around this humbling journey, and fine-tuning my process along the way!

I've learned several things in my first year of blogging that I would have never learned if I didn't get started.  So, if you are considering blogging, the first step is to GET STARTED!!!

If you made it to the end of this post, thank you!  This post took me days to write, and I really appreciate your willingness to listen. :)

Easter Greetings


Wishing you a wonderful Easter weekend filled with moments of reflection, and quality time with family, friends, and loved ones!

Xo, Carol

The ORC has arrived!

The One Room Challenge is here!!!  The ORC, as it is commonly known, is a design series where you are challenged to "make over" a room in a six-week time span.  Participants document their progress weekly to share with an online audience.

Linda at Calling It Home is the mastermind and host of the One Room Challenge.  There are so many like-minded individuals who have true passions for interior design, and the ORC is one place where they can virtually convene to share their projects - start to finish!


orc

The spring ORC just kicked off, so head on over to Linda's blog every Wednesday and Thursday for weekly progress updates on all the linking participants!


Fall 2014 ORC Project Feature

Last fall's ORC series featured several beautiful projects.  One was the transformation of a NYC apartment done by Mackenzie Horan of Design Darling   Mackenzie transformed her boyfriend's "bachelor pad" from brown, drab, and dreary, to light, airy, and inviting!

one room challenge

What the room originally looked like:

one room challenge

one room challenge

I was drawn to this project because I could relate to it.  Who doesn't have a "catch all" space that's filled (or was once riddled) with brown furniture and heavy wood pieces?!


one room challenge
After

one room challenge
Before

one room challenge
After

one room challenge
Before

This project was rooted in selecting the "proper" furnishings for the space (not only aesthetically, but with proper scale and balance), good lighting, and creative interior styling.  It was all about having vision for the room, bringing out and maximizing its potential, and pulling it all together - on a "real people" budget!  Head on over to Design Darling for more of the before and after transformation.

{All photos are from the Design Darling blog.}